
Wednesday, November 17, 2010
check this out!
Check out Myriam Babin's blog, New York Kitchen, for an upclose look at the Gramercy Tavern pastry kitchen! Also read Myriam's older post on the savory side of the kitchen.


Sunday, November 14, 2010
as american as...

...apple pie
When I first started thinking about moving into the food industry, I decided to take an amateur baking class. The first thing we tackled was a classic pie. It really is the quintessential American dessert. Whenever I think of what a classic pie should look like, I automatically think Jim Davis and Garfield. I have always loved his drawings of lasagna, turkey and especially pie. His pie has a solid, thick layer of filling and a substantial, rippled crust. YES. That is my ultimate pie.

Part of my production list at work now includes making apple pies. The crust dough is made in advance, so I am in charge of rolling it out, assembling the filling and baking it off. Seriously, though, how cool is that? Who doesn't want to make pies for a living? I get to make a lot of finished products now for work---pies, upside down cakes, bread pudding---not just sauces and candied nuts and I am really enjoying it.
So here are a few of my pie preferences, since the holidays are coming up. I use 9" perforated pie tins from Williams Sonoma and I love them. I like a mix of Fuji or Honey Crisp and Granny Smith apples. I cut the firmer apples, like Granny Smith, slightly thinner than the softer Honey Crisps, so that the apples all bake evenly. I use lots of apples---6 large apples or 8 smaller ones. They will bake down in the oven so more is always better. I don't use cinnamon in the pie, though I do sprinkle some on the top. I think Americans in general abuse cinnamon in baked goods. I want my apples to taste like apples, not like Comstock canned pie filling, so I use just sugar, lemon juice and a little vanilla bean for my filling. I know Alton Brown recommends using Caraway, which I think is fine too. It is also important to roll both crusts to an even thickness so that your pie retains it's giant dome when it comes out of the oven. If there are thin spots in your crust, the steam will burst through, create holes in the crust and your dome will deflate when it comes out of the oven. Lastly, I don't cut my pie for several hours after it has come out of the oven. The filling needs time to solidify so it can look just like a classic Jim Davis slice.
Below is the recipe I use for the crust. It's true, that if you use half shortening and half butter, you get a flakier crust, but for me, you can't beat the taste of an all butter crust.
flaky pie crust
for two 9" pie crusts
1 C. cake flour
1/2 teaspoon salt
1/2 teasopoon sugar
1/2 C. (1 stick) cold butter, cubed
1/4 C. ice water
Mix the cake flour, salt and sugar together.
Add the butter and combine by flattening the butter cubes and rubbing them into
the flour mixture.
Form a well in the mixture and add the the cold water.
Use your hands or a spatula to form the dough, being careful not to overwork the dough. Add more water if needed, a teaspoon at a time.
Divide dough in half, wrap in plastic and refrigerate at least 30 minutes (or overnight) before using.
diabetic chocolate chip cookies
Gee, this is a hard one. I think a chocolate chip cookie should look like this.

And not like these.

I guess they don't look that bad, but they taste granular and have that same fake sugar aftertaste you get when you drink Diet Coke. I have been trying to find a good recipe now for a couple weeks, and it has proven to be quite a challenge. (The cookies above are the same recipe, just different baking times and different sizes.) Not only do they taste grainy, but they refuse to brown. I have been spraying them with Pam before I throw them in the oven and that has given them a little color at least. These cookies are for a special order at the end of the month, so if anyone has a good recipe, let me know!
Monday, October 4, 2010
krispies experiment
 rice krispies treats
So I have a project on the horizon. At the end of November I will be making a cake and an assortment of treats for a wedding. The bride requested cupcakes, chocolate chip cookies, brownies and Rice Krispies treats. My mom never made Rice Krispies treats for us growing up so I decided to start playing around with a recipe for them first. I made a batch from the original recipe on the box, just to see what it tasted like. YECH. Melted marshmallows and the tiniest bit of butter just didn't do it for me.
Who has been watching Top Chef Desserts? I have and I was ecstatic to see that the latest episode featured a sophisticated version of Rice Krispies treats. Eric the baker came up with a terrific recipe that used a sugar syrup mixed with melted butter to hold the krispies together. What a difference in taste that one step made. On top, Eric added a combination of peanut butter, nutella and milk chocolate followed by a layer of bittersweet chocolate. I went for all Nutella instead of adding peanut butter because I am obsessed with Nutella. You could also do just peanut butter if you wanted to and it would be delicious.
It takes a bit of planning because each layer has to set in the fridge for a few hours before adding the next layer, but I thought it was well worth it. The texture and taste are amazing and they looked so grown up when I cut into thin strips.
adapted from Eric Wolitzky's Peanut Butter Krispy Bars
http://www.bravotv.com/foodies/recipes/peanut-butter-krispy-bar
ingredients
1 cup water
1 cup sugar
1 1/2 sticks of butter melted
8 cups Rice Krispies
2 cups milk chocolate
4 cups Nutella
1 stick butter
2 cups bittersweet chocolate
1/2 stick of butter
1 tablespoon corn syrup
instructions
Place Rice Krispies in a large bowl.
Line a half sheet pan with parchment paper and spray thoroughly with nonstick spray (or if you have a silpat, now is the time to use it).
Combine the water, sugar and corn syrup in a medium saucepan over medium heat. Stir with a wisk or heat proof spatula until the sugar dissolves and mixture starts to boil (don't stir after that otherwise you will cause the the sugar to recrystallize!). Using a candy thermometer, cook until mixture reaches 240 degrees. Turn off heat and add melted butter, whisking to combine. Be very careful with the mixture---it is blazing hot and will cause quite a bad burn if you're not careful.
Pour mixture over Rice Krispies and toss vigorously to combine. Spread Krispies evenly onto sheet pan and refrigerate for several hours or overnight.
Bring a small amount of water to a simmer in a medium saucepan.Combine milk chocolate, Nutella and butter in a bowl and place on top of a saucepan (this set-up is called a bain-marie). Let everything melt 3/4's of the way, then take off the heat and stir continuously until the mixture is completely melted and combined.
Spread evenly on top of Krispies and return to the refrigerator for several hours until set.
Melt the bittersweet chocolate, corn syrup and butter following the same procedure as above. Spread evenly over the Nutella layer and let set in the refrigerator for several hours.
Remove from pan, cut with a sharp knife and enjoy!
Monday, September 13, 2010
snack time!

toffee popcorn
So I finally made the toffee popcorn we make at work---with a small alteration, that is. I made the same amount of sauce but used less popcorn. I wanted the kernels to be more thoroughly covered with toffee, just like the caramel corn at Johnson's Popcorn down in Ocean City, New Jersey. I popped the popcorn in a brown paper lunch bag in the microwave since I don't have an air popper. I didn't know you could do that and was extremely pleased with the results. I put a quarter cup of kernels in at a time, folded over the top of the bag and microwaved for two minutes.
It's easier to make the popcorn with two people---one to pour the sauce and the other to toss the popcorn vigorously in the bowl. I had to make it by myself, but kept getting splattered, so consider yourself warned....
I have a feeling I'll be making a lot of this in the future, especially since it's officially football season now. Let's go COLTS (and concurrently, Arian Foster, where did you come from??? You RUINED MY DAY). And let's go Giants, too. Eli didn't look too bad on Sunday, even with the 3 interceptions.


ingredients
1/2 cup unpopped corn kernels
1 1/2 cups granulated sugar
1/2 pound of butter (2 sticks)
1/2 cup light corn syrup
1 teaspoon vanilla extract
1 teaspoon table salt
instructions
Pop the kernels in two batches, a quarter cup at a time, in a brown paper bag in the microwave. Microwave on high for about 2 minutes, or until the popping has slowed.
Thoroughly butter a large mixing bowl and place the popped popcorn inside.
Combine the sugar, butter and corn syrup in a large saucepan. Place over high heat and stir the mixture continuously. The mixture will thicken, foam up and gradually darken. The picture above shows the toffee about half way through the cooking process. It is thickening at that point, but still not dark. Cook until the toffee is a medium tan color I call teddy-bear brown.
Turn off the heat and add the salt and vanilla, stirring quickly to combine.
Immediately pour the toffee over the popcorn. Using two spatulas, toss the popcorn with the toffee until all the popcorn is covered.
Pour the popcorn onto the counter and separate the kernels by hand. Work quickly and carefully because the the toffee will be extremely hot. (At work, some people wear latex gloves sprayed with Pam to keep kernels from sticking to their fingers.)
Make sure the toffee popcorn is completely cool before storing in an airtight container.
Monday, August 30, 2010
an exotic frozen dessert

pistachio kulfi
Chris and I just finished watching the latest season of the Next Food Network Star. I found the show enormously frustrating because the majority of the contestants didn't cook well at all. Except for the woman who won, Aarti. I watched the first episode of her new show, Aarti Party, because I was curious to see if the recipes she came up with would be any good. I tried her recipe for kulfi, an Indian-style ice cream, first. Kulfi is denser than ice cream because you don't spin it in an ice cream maker and it doesn't contain any yolks like in a traditional custard base.
Her recipe called for sweetened condensed milk, heavy cream, earl grey tea steeped in evaporated milk, and chopped pistachios and raisins. It was incredibly delicious, if a bit overly sweet (there are close to 1000 calories in one cup of sweetened condensed milk---yikes!). Here's a link to the recipe in case you're feeling adventurous: http://www.foodnetwork.com/recipes/aarti-sequeira/creamy-pistachio-pops-recipe/index.html.

strawberry sorbet
At work, we make a strawberry pie. The filling is made simply----lots of fresh strawberries and a little sugar, cornstarch and lemon juice. There's always leftover filling at the end of the night, so I decided to to take it home, puree it and spin it. Chef was concerned that there wouldn't be enough sugar in it to keep it from being icy, but I thought it turned out pretty well. The brilliant red color was the best part. That and the fresh strawberry taste.
Thursday, August 19, 2010
beating the heat

blueberry sorbet
I can't believe how hot this summer has been. Unfortunately for me, the temperature in the kitchen at work is always hotter than the temp outside. It has been 100 degrees inside on some of the hotter days outside. Some of the girls have taken to keeping ice pops---the kind that are frozen in a stick inside a slim plastic sleeve---in the freezer upstairs to use as cooling agents. They strategically place the ice pops inside their chef coats to keep themselves cool. I just stick to drinking lots of ice water and making lots of frozen treats, like sorbet, at home.

Sorbet is so easy to make because it doesn't require any cooking if you use simple syrup instead of raw sugar. I ended up making this sorbet two times this week. The first time I used a ready made frozen blueberry puree. The sorbet came out very icy and I found it nearly impossible to scoop. The second time, I made my own puree with two pints of fresh blueberries. I threw them in the blender then passed my puree through a strainer to make it smooth. The sorbet came out with a velvety texture and tasted incredibly fresh. I want to try it again but with different flavors this time, such as blueberry basil or blueberry lime.
at work...
We are now serving the famed blueberry corn sundae at work. It has layers of blueberry corn compote, toffee popcorn, sweet corn ice cream and black pepper whipped cream. It also comes with a delicious little corn muffin on the side. Chef was invited on the Martha Stewart show in 2009 to demo this sundae: http://www.marthastewart.com/recipe/blueberry-corn-ice-cream-sundae?video_id=0. It looks so stunning in the sundae glass that it's hard to resist. People have been asking about for weeks now, but we couldn't put it on the menu until the extra sundae glasses Chef ordered came in this past weekend.
We've also been on high alert because the health department is expected to come in any day now for an inspection. We've had two drills in the past few weeks and it's funny to see everyone scrambling around to get things cleaned up in time. Our pastry department doesn't have much to worry about, though, because we run such a tight ship. The only thing we have to update is the way we label products used upstairs on the line for service. The label should have the date it was made, the product name, the time the product was taken out of cold storage, the temperature of the product in cold storage and the time we intend to discard the product. This insures that the everything we serve stays out of the temperature "danger zone." One of the chefs at work sings "Danger Zone" from Top Gun whenever that term is mentioned. Heh.
Tuesday, August 3, 2010
the cake project

75th birthday cake
FINALLY. I have internet access again. Four frustrating days of waiting and one new wireless router later, I am up and running again. So this is it! A cake with a beach theme for a 75th birthday. The top layer is a treasure chest which I built out of pastillage. I made multiple little gold coins and pearl necklaces to fill it with. The chest lifted up to reveal a mini cake underneath, which I unfortunately didn't have time to take a picture of. It was pretty darn cute, though, I assure you. The cake was a butter cake with vanilla buttercream and vanilla bean custard filling and was covered in fondant. I made beads for around the cake (the gold color looks a little tinny in the pic, but in real life was quite brilliant) and a few white chocolate sea shells as well.
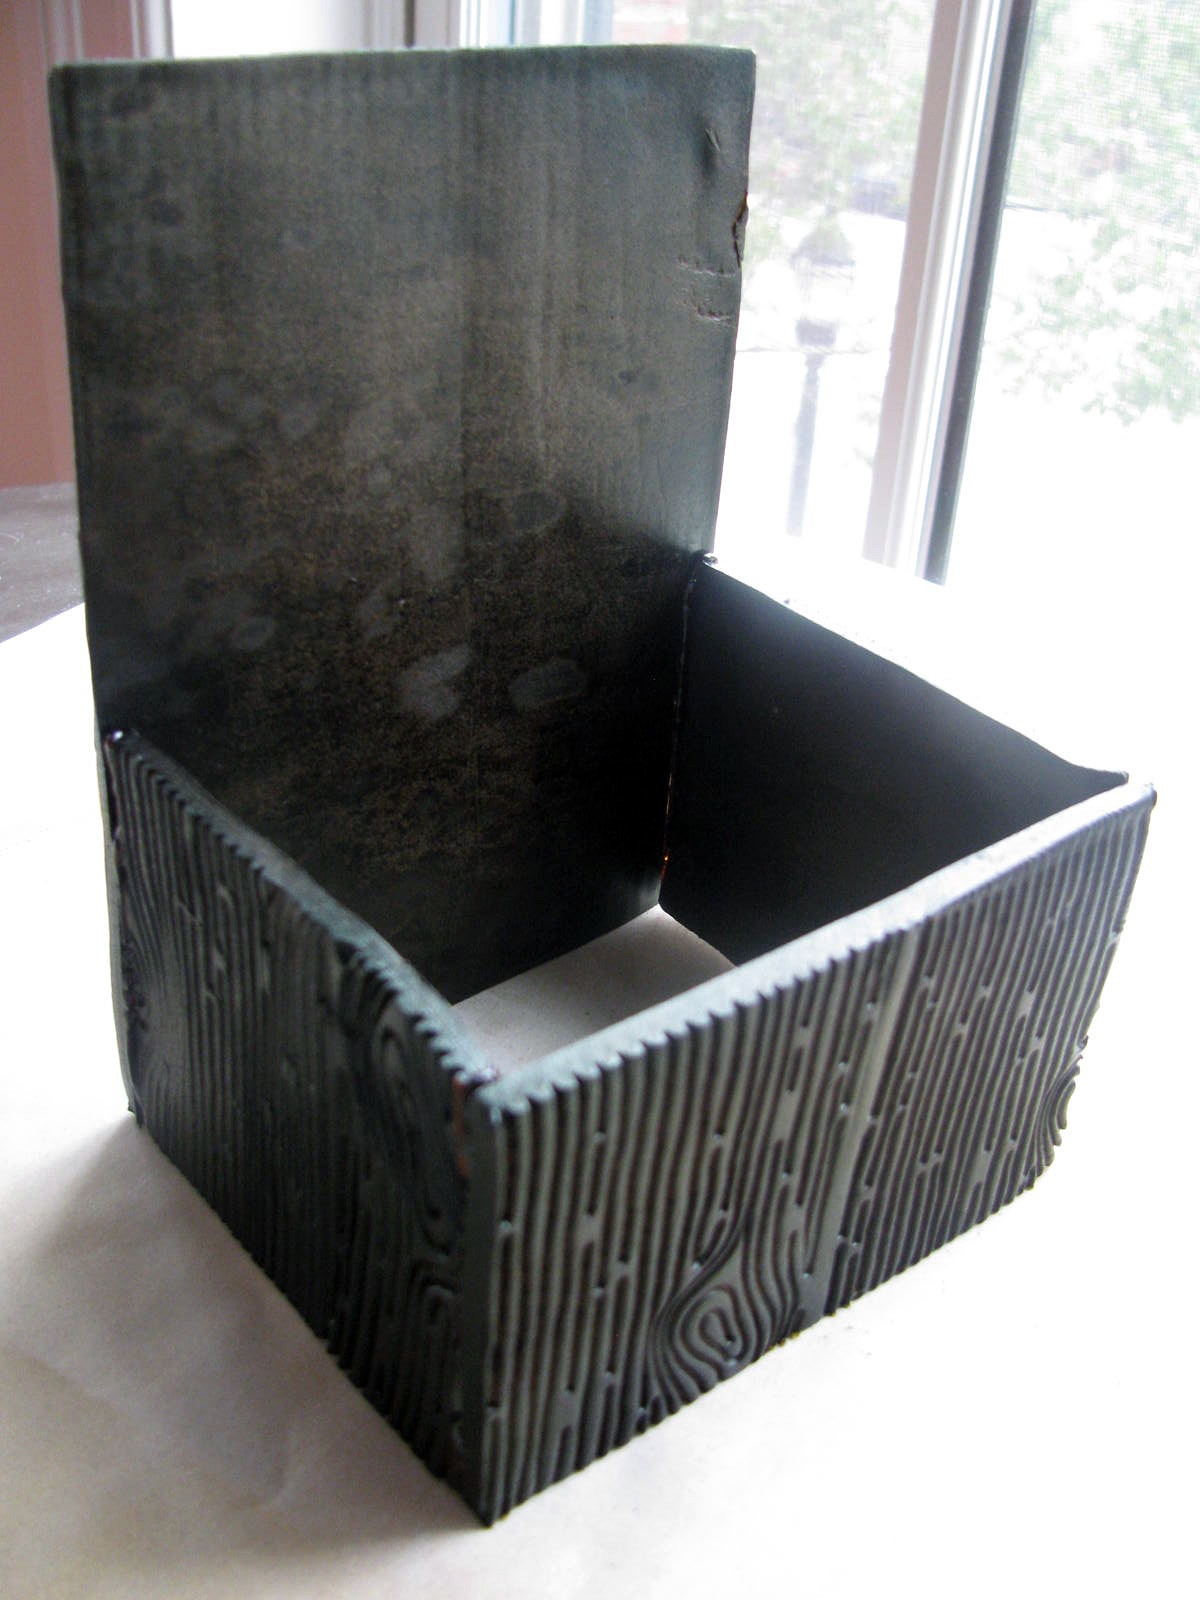
The chest took the most time. I had to make the pastillage in advance and imprint it with the wood texture. Then I had to assemble it and airbrush it. Next, I cut all the detail pieces, like the handles, out of sugar paste, let them dry, airbrushed and attached them. Above is a picture of the box before I added any detail pieces.

After the cake was picked up, I literally didn't know what to do with myself. It was the strangest feeling. I thought of a line from one of my favorite movies, "The Bad and the Beautiful", with Kirk Douglas and Lana Turner. Douglas, who plays a movie producer, says " After I finish a picture, something happens to me. It's a feeling of letdown, emptiness..." A tad melodramtic, but still...
at work...
So I had an office day yesterday. Chef wants to put together a document with pictures of each of the desserts we make, a list of their components and ingredients and a notation of whether or not they have gluten, nuts, soy or other common allergens. Allison, who I work with most up on the line, took a good deal of the pictures. She has a beautiful blog http://www.dolcettoconfections.com/blog/ with wonderful recipes and photographs. I then put all the pics in a document, looked up all the recipes and typed everything out. I did it in a Word document which was painful for me since PC's and Word both suck. Really, really suck. It was strange to sit at a desk for a few hours instead of running around the kitchen.
We are starting to make toffee popcorn at work. Will post on this soon because IT IS HIGHLY ADDICTIVE.
Also, I am trying to get together with Roger, the sous chef at work and incredibly talented chocolatier, so he can show me a few tricks with bon bons. He just made a blueberry lemon verbena chocolate which is incredibly amazing. Will try to get lots of pictures for this as well.
Subscribe to:
Posts (Atom)


